You didn’t buy a new lawn mower just for show. You bought it to spruce up your lawn and get on with your day. And let’s face it: no one wants to spend time diagnosing an engine issue.
When a small engine starts acting up, the problem usually comes from the carburetor. It’s a costly part of the engine to replace, but more often than not it just needs bit of TLC rather than a replacement.
If your mower doesn’t start, idles roughly or just doesn’t accelerate the way it once did, you can blame the carburetor. These problems have increased since treated fuels that contain ethanol, such as E10, entered the marketplace. Ethanol is pure alcohol and attracts moisture, which leads to corrosion inside the fuel tank and carburetor. If fuel is left inside a small engine for too long, it eventually evaporates and leaves behind a gummy varnish that causes clogging. That obstruction makes it difficult to burn the fuel needed to run the engine.
So, then what? Don’t throw it out. Just drain the old fuel and clean the carburetor. Here’s how in just 10 easy steps:
Step 1: Remove the spark plug cap so the engine doesn’t fire. Then, turn the fuel valve to the off position.
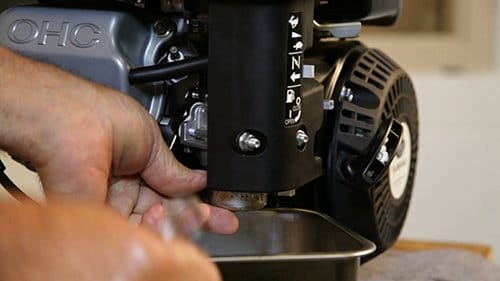
Step 2: Next, drain the fuel. Remove the screw that attaches the carburetor bowl to the bottom of the carburetor, drain the bowl into a container and evaluate the fuel condition. Take note of rust, dirt, corrosion bits or old fuel. Generally, if there’s old gasoline in your engine, varnish will stick to the bottom of the carburetor bowl.
Step 3: If the carburetor bowl has a sticky residue in it, spray the inside with carburetor cleaner and wipe it clean. If the material in the bowl is liquid, simply wipe it dry.
Step 4: The main jet’s passage is where fuel flows through the carburetor into the combustion chambers. To inspect the jet passage, remove the jet with a flathead screwdriver. This is a very small brass piece, so be sure you have a pan of some sort to catch it.
Step 5: If the jet passage is blocked, spray carburetor cleaner into it and clear out any particles or gummed fuel by pushing a wire brush through. Be careful not to make the passage any larger than its original size. You just need a nice, clean, shiny round hole for gasoline to pass through.
Step 6: Remove all material that could come loose and clog up the jet again by spraying the rest of the carburetor components with carburetor cleaner. Make sure you catch overspray with a rag.
Step 7: The idle jet, which might need service, is at the top of the carburetor. Some carburetors’ idle jets will unscrew at the top. Others are pressed in or might be plastic with O-rings to seal them. To clean the idle jet, pass a wire brush through it to be sure the opening is clear.
Step 8: Reassemble by placing the main jet back into the carburetor stem with a screwdriver. Make sure it is snug but do not over tighten.
Step 9: Check the gasket (either flat or O-ring) that seals the carburetor bowl to the carburetor body to make sure it is in position and not torn or warped. Tighten the screw and washer that hold the carburetor bowl to the carburetor body. Do not over tighten.
Step 10: At this point, you should make sure there is no fuel around the carb bowl. Before starting the engine, turn the fuel valve back on and replace the spark plug.


