The trees are bare. The sun sets before the end of the workday. The familiar sound of a heater kicking on fills your living room. Cooler weather has settled in, and winter will be here before you know it.
Everyone goes through some sort of personal winterization process during the days and weeks leading up to the first snow. Wardrobes are switched out for bulkier, warmer materials, and windows are covered to better insulate homes. And for some, it’s simply an attempt to try to mentally prepare for the bitter cold, which never actually makes it any easier.
But your apparel and home aren’t the only things that need winterization. Your outdoor equipment also needs to be prepped.
If your machine will be stagnant for more than 30 days or stored in extreme-cold conditions, follow the winterization steps below to prevent equipment damage and ensure a smooth start-up next spring.
Engine Winterization Steps
1. First things first: Before you winterize your engine, it needs a good cleaning. Take your time, be thorough and get into all the nooks and crannies that get missed and overlooked during routine cleanings.
2. Then, you need to assess the condition of the air filter. If it’s a foam filter and still in good condition, clean it before reinstalling. Replace the filter if it’s missing chunks of foam or starting to deteriorate. To wash an air filter, lather it with warm, soapy water, then add a dab of oil to it before blotting it dry. If the engine has a paper filter, it should always be replaced before winter storing.
3. One of the main reasons engines need to be winterized if stagnant for more than 30 days is because fuel becomes stale.This leads to gummy residue build up that can clog and damage the engine. There are two options for preventing this potential issue.
The first option is to drain all the fuel from the tank. Once the tank is empty start the engine and let it run for a few minutes to make sure the fuel lines and carburetor are dry.
The second option is to fill the tank full and add a fuel stabilizer. The tank needs to be filled completely because a half-full tank leaves room for condensation, which can lead to rust. However, you should only go this route if your engine has a fuel shut-off valve so fuel doesn’t leak into places it shouldn’t. After filling the tank, shut off the valve and run the engine until it dies. This ensures a dry carburetor.
4. Next, change the oil. Oil should always be changed before winter storage. If oil is stagnant for too long, acid buildup can occur and corrode the engine. It can also become thick and gummy and hinder starts. When adding oil to the engine before storing for winter, it’s a good time to adjust the viscosity. Using multi-viscosity oil is great in areas with harsh winter weather because it recognizes outdoor temperatures and adjusts to the proper viscosity.
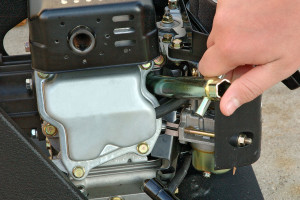
 5. Lastly, replace the spark plug. Spark plugs that are damaged or corroded can cause electrical damage to the engine over time. After removing the old spark plug, spray a shot of oil into the cylinder. Then pull the recoil handle several times to evenly distribute a film of oil on the cylinder wall before installing a new spark plug.
Though it does require some time and effort to prepare an engine for winter, it’s a small price to pay to keep machines in tip-top condition. You’ll be thankful you did when it’s time for spring tune-ups.


